Close
All Categories
    Filters
    Preferences
    Search
    RSS

    Strand Hardware Blog

    Unlocking the Versatile Potential of Portable Routers: A Guide to Precision Woodworking
    0 Unlocking the Versatile Potential of Portable Routers: A Guide to Precision Woodworking

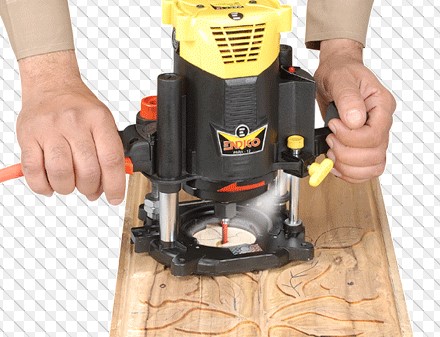
    Over the past thirty years, woodworking has progressed remarkably, but amid this evolution, one tool has emerged as a game-changer in workshops—the portable router. Its versatility and diverse applications have elevated it to an indispensable companion for woodworking enthusiasts, whether professional or DIY. This article explores the multifaceted capabilities of the portable router, ranging from shaping edges to intricate inlay work, while also providing crucial insights into safety precautions and factors to consider when purchasing this tool.

    Unlocking the Portable Router's Extensive Abilities:

    The portable router is a genuine workhorse that can undertake an impressive array of tasks, revolutionizing woodworking by introducing a new level of precision and creativity. Below are just a few examples of its remarkable abilities:

    Edge Forming: Effortlessly craft classic beading or intricate ogee profiles, enhancing the refined aesthetics of your woodworking projects.

    Lap Joints: Establish seamless connections through lap joints, reinforcing the structural integrity of your creations.

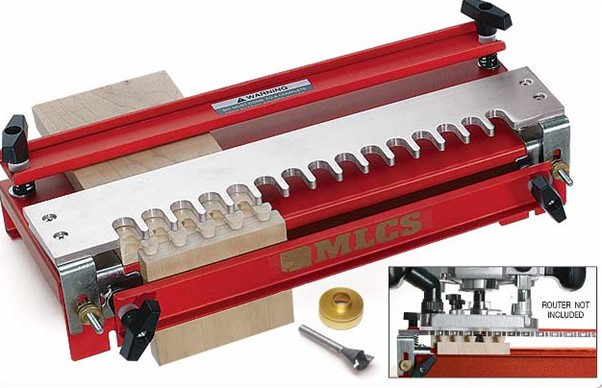
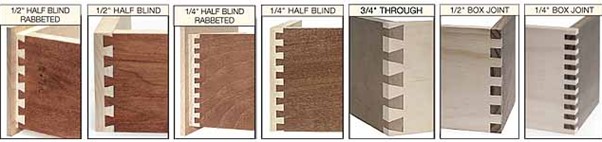
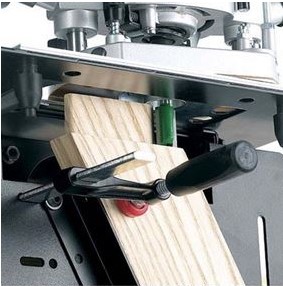
    Dovetail Joints: Employ the router's precision to create dovetail joints, renowned for their strength and visual appeal in fine woodworking.

    Rebates: Achieve immaculate rebates, ensuring components fit flawlessly together and contributing to a seamless finish.

    Carving and Lettering: Unleash intricate carving and lettering possibilities, transforming ordinary surfaces into personalized artistic expressions.

    Inlay Work: Elevate your woodworking projects to a museum-worthy level with captivating inlay designs that showcase your craftsmanship.

    Laminate Trimming: Achieve smooth, professional laminate edges, using the router's precision for impeccable trimming.

    Mortise and Tenon Joints: Craft accurate mortise and tenon joints for enduring connections that withstand the test of time.

    Fitting Mortise Door Locks and Door Hinges: Attain precise fits for door locks and hinges, ensuring seamless door functionality.

    Ellipse and Circle Cutting: Seamlessly cut precise ellipses and circles, adding distinctive shapes to your creations.

    Trenching and Dadoes: Achieve grooves and dadoes with exceptional precision, catering to shelving and other joinery requirements.

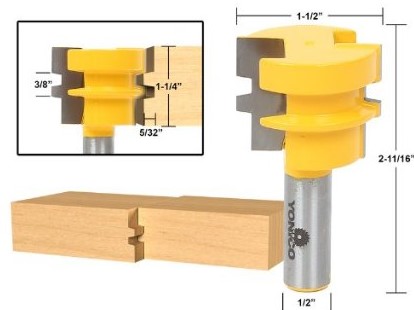
    Glue Joints: Employ the router to create tight-fitting glue joints, enhancing the strength and durability of your projects.

    Style and Rail Joints for Raised Panel Doors: Showcase your woodworking finesse by crafting classic raised panel doors with elegant style and rail joints.

    Panel Raising: Introduce dimension and elegance to cabinet doors and panels through distinctive raised panels.

    Post-Form Top Joining: Enhance furniture aesthetics and functionality by creating seamless joins for post-form tops.

    Prioritizing Safety During Router Operation:

    Despite its power, safety remains paramount when operating a router. Adhering to these safety guidelines ensures incident-free woodworking sessions:

    Clean Collet: Regularly clean the collet to maintain a secure bit grip, preventing any compromise due to dust or grime accumulation.

    Proper Bit Insertion: Insert the router bit with around 2/3rds of the shaft securely held by the collet, paying heed to any depth indicators.

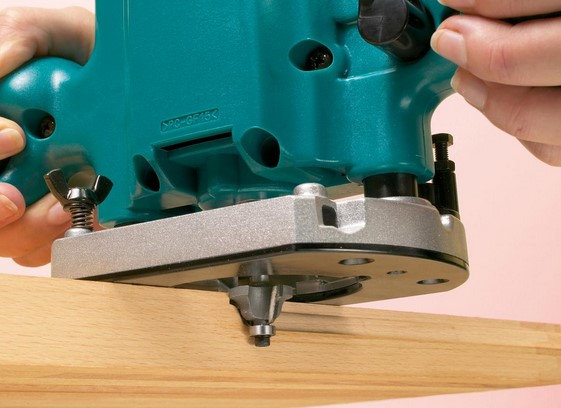
    Two-Handed Operation: Maintain control and stability by always gripping the router with both hands when the motor is active.

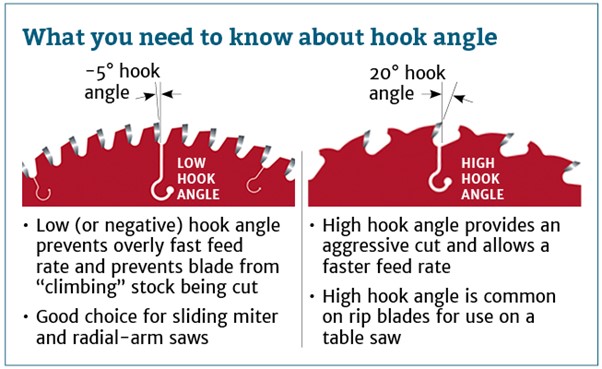
    Feed Rate: Opt for an optimal feed rate; too slow leads to burning, while excessive speed overloads the motor. A medium rate delivers optimal outcomes.

    Cutting Direction: For enhanced control and precision, consistently cut against the cutter's rotation direction.

    Bit Maintenance: Keep bits sharp and clean, utilizing a flat diamond grit card to sharpen the cutting face's back. Post-use, oil and clean the bit to prevent rust.

    Protective Gear: Shield against noise and dust by donning ear defenders and a dust mask, ensuring a safer working environment.

    Choosing Router Bits Wisely:

    When investing in router bits, quality reigns supreme, impacting performance and durability:

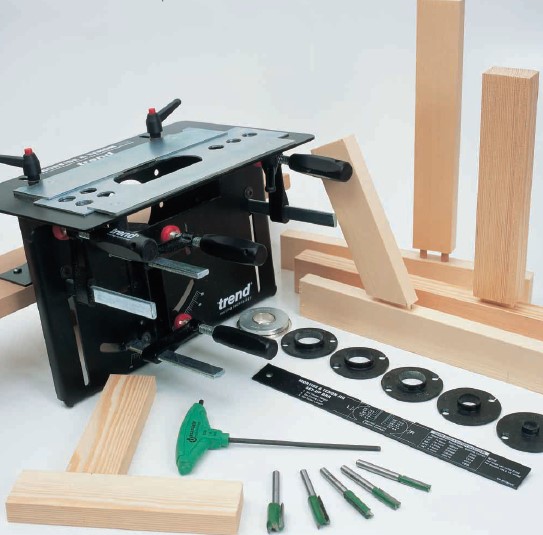
    Shank Sizes: In the South African market, router-bit shank sizes commonly come in ¼” and ½”. These diverge from the European 6mm and 12mm counterparts.

    Industrial vs. Portable: Heavy-duty ½” shank routers are prevalent in industrial settings, frequently mounted on router tables. Meanwhile, ¼” shank routers offer portability and ease of use.

    Quality is Key: Opt for quality over cost when selecting router bits. Superior bits boast smoother bearings and better tungsten carbide, ensuring longevity and precision.

    In Conclusion:

    The portable router has rewritten the possibilities of woodworking, endowing a broad spectrum of capabilities that enhance craftsmanship. From intricate designs to seamless joints, this adaptable tool broadens horizons in both creativity and accuracy. By adhering to safety protocols and investing in high-quality bits, your woodworking journey with the portable router is bound to be gratifying and productive.


    Mastering Bandsaw Precision: A Comprehensive Guide to Blade Selection and Alignment
    0 Mastering Bandsaw Precision: A Comprehensive Guide to Blade Selection and Alignment

    Bandsaws, versatile tools renowned for their precision in woodworking tasks, occasionally encounter obstacles that impede their performance. Within this article, we will delve into prevalent issues faced by bandsaw users—blades breaking, inaccurate cuts, and unwelcome noises. We will delve into the correlation between these issues and blade selection and improper alignment, offering practical advice to overcome these challenges and relish seamless cutting outcomes.

    Selecting the Right Blade: Ensuring Precision

    The selection of an appropriate blade is pivotal to achieving accuracy and avert potential complications.

    Here's what warrants consideration:

    Determining Blade Length: Accurate blade length is paramount. In cases where it's absent from the machine's nameplate, measurement of a fitting old blade suffices. Employ a felt-tipped pen to mark the starting point for measurement.

    Choosing Blade Width: Blade width influences cut curvature.

    • Utilize a 6mm blade for intricate curves.
    • Opt for a 10mm blade for straight and moderately curved cuts.
    • Select a 13mm blade for primarily straight cutting.

    Tooth Arrangement: Coordinating tooth configuration with wood thickness is vital. The goal is around 3 teeth engaging the wood.

    While acquiring coarser blades beyond 4 teeth per inch (tpi) is demanding, adhere to this rule of thumb:

    • 14 tpi for 6mm thick wood.
    • 6 tpi for 12mm thick wood.
    • 4 tpi for wood 20mm or thicker.

    Noise and Blade Coarseness: Annoying sounds often result from deploying a fine blade on thick wood. Counter this by switching to a coarser blade. This spacing between teeth prevents swarf entrapment and the resultant squealing noise.

    Blade Alignment: Crafting Precise Cuts

    Faulty blade alignment undermines precision and introduces frustration. This stepwise guide facilitates blade alignment for optimal outcomes:

    Step 1: Preliminary Alignment Measures

    • Loosen the blade tensioning knob.
    • Remove the table insert and the end-slot pin.
    • Extract the old blade.


    Step 2: Calibration of Blade Guides and Support Bearings

    • Loosen screws and knobs holding blade guides and support bearings. An allen key may be necessary.

    Step 3: Installing the Fresh Blade

    • Confirm that teeth face downward towards the table. Inverting the blade corrects orientation.

    Step 4: Tensioning and Tracking

    • Apply appropriate blade tension (or 6mm deflection over 150mm distance for untitled blades).
    • Verify that the blade follows the centre of the wheel. If necessary, alter the tilt of the upper wheel.

    Step 5: Fine-tuning of Guides and Bearings

    • Start by addressing the bearings positioned behind the blade, both above and below the table.
    • Gradually shift them forward until a 1mm gap emerges between the blade and the bearing.

    • Proceed to adjust the guides situated on either side of the blade.
    • Maintain a minimal distance, roughly equivalent to the thickness of a sheet of paper, between these guides and the blade.
    • A helpful hint: Slide a folded piece of paper or a banknote between the blade and the guide blocks.
    • Apply pressure to secure the two blocks against the blade, locking them securely in place.

    • Afterwards, remove the paper insert and manually rotate the upper wheel to ensure smooth blade movement.
    • Note that these guides offer flexibility in both backward and forward adjustments.
    • Be cautious to prevent contact between the guides and the blade's teeth to prevent any potential blade damage.
    • If you observe wear and tear in the guide blocks, it's advisable to remove them and restore their shape by sanding them squarely with the use of a disc sander.

    Step 6: Validation of Table Alignment

    • Confirm the table's 90-degree alignment with the blade. Make necessary adjustments through table bolts.

    Conclusion

    Adherence to these blade selection and alignment insights empowers you to surmount typical bandsaw challenges, facilitating seamless, accurate, and trouble-free cutting endeavours. Optimal blade choice and precise alignment transform your bandsaw into an instrument of pleasure, instilling the confidence and precision essential for tackling woodworking projects.

    Crafting Excellence with Table Saw Precision: Key Adjustments Every Woodworker Should Know
    0 Crafting Excellence with Table Saw Precision: Key Adjustments Every Woodworker Should Know

    Woodworking enthusiasts are aware of how important accuracy is to their artistic vision. Every woodworking workshop is built around the table saw, a multipurpose tool that transforms unfinished lumber into pieces of art. Precision is the key, depending on four fundamental refinements. We'll walk you through these adjustments in this document to make sure your table saw is set up for success.

    1. Blade Alignment with Mitre Slot Groove: Anchoring Precision

    During the inaugural assembly of your table saw, meticulous attention is dedicated to ensuring the blade's alignment with the mitre slot groove. This preliminary synchrony is pivotal for precise incisions. A straightforward technique to evaluate this alignment entails situating a straight edge adjacent to the blade, followed by using a Vernier calliper to compute the distance from the groove to the rule.

    If you experience any non-parallelism with the blade, don't be concerned. The screws holding the trunnion assembly to the table must be loosened as part of the adaption operation. You can get precise alignment by carefully manipulating the assembly. It becomes necessary to unbolt the bolts holding the table to the framework and then adjust when certain saw models have an immovable trunnion. The good news is that blade parallelism realignments are rarely required, making this step more common practice for many carpenters.

    1. Ensuring Fence Synchrony: Priming for Precision Cuts

    Fences stand as indispensable components of any table saw, yet their configuration varies amidst diverse models. The fundamental principle remains unaltered: the fence must align in parallel with the mitre slot groove. To achieve this congruence, the utilization of adjustment screws is imperative, which modify the angle between the fence and the fence rail. Give this detail plenty of time to be mastered because a well-matched fence ensures that your workpieces will be carefully guided for flawless cuts.

    1. Blade Orthogonality to the Table: The Art of Right Angles

    Determining the blade's orthogonality to the table assumes a pivotal role in obtaining square cuts. For this purpose, employ a square in conjunction with the blade. The tilt mechanism of the saw incorporates a casting that engages an adjustment screw upon reaching a stop. Upon this cessation, the blade should manifest an impeccable 90-degree alignment with the table. This tuning guarantees that your incisions are not solely precise but also geometrically congruous.

    1. Mitre Square Accordance: The Culmination of Adjustments

    Making sure your mitre square is perpendicular to the blade is essential for the ideal setup. The use of a square is once again utilized to support this uniformity. You should be able to precisely fine-tune the alignment of your mitre square thanks to adjustment screws. When using the mitre gauge for angled cuts, this step ensures that your workpieces will precisely meet your precision requirements.

    Conclusion: Artisanal Excellence via Table Saw Refinements

    Your woodworking endeavours demand nothing less than quality, and this pursuit of greatness begins with the accuracy of your table saw. You can set the foundation for accurate and satisfying woodworking projects by becoming a master of these four cardinal adjustments: blade parallelism, fence alignment, blade orthogonality, and mitre square conformity. Remember that even though these details might seem technical, they fundamentally support your woodworking knowledge and allow your creativity to shine through flawlessly finished items.

    Mastering Woodworking Success: The Art of Blade Selection for Precision Cuts
    0 Mastering Woodworking Success: The Art of Blade Selection for Precision Cuts

    In the realm of woodworking and the pursuit of successful project outcomes, there exists a pivotal but often neglected factor that holds the potential to either elevate or hinder your results: the choice of the appropriate blade. The importance of choosing the right blade goes beyond mere insignificance; it serves as a crucial factor that directly determines the quality of your cuts and, eventually, influences the success of your project.

    Determining Blade Size and Bore Size:

    Before delving into the intricacies of blade selection, it is essential to commence with the fundamentals: ascertaining the suitable blade size and bore size for your machinery. These measurements hold a paramount role in ensuring not only optimal performance but also the safety of the operation. The alignment of blade diameter and bore size with your equipment's specifications is imperative to ensure a seamless operation that yields precision cuts.

    Factors to Contemplate During Blade Selection:

    Beyond the rudimentary attributes of blade and bore dimensions, there lies an array of other elements that beckon your consideration for a well-informed blade choice. Let's begin a thorough investigation of these crucial aspects:

    Number of Teeth:

    The quantity of teeth adorning a blade exerts a substantial influence on the nature of the cuts attainable. Distinct cutting tasks warrant recommended tooth counts:

    24 Teeth: An optimal choice for rip cuts, where the objective is to sever along the wood's grain.

    60 Teeth: Tailored for cross cuts, enabling meticulous incisions across the grain's span.

    40 Teeth: A versatile selection catering to combination tasks, affording equilibrium between ripping and cross-cutting endeavours.

    Kerf Width:

    The width of the cut induced by the blade, denoted as kerf width, holds the key to curbing material wastage and energy consumption. Broadly speaking:

    Standard Width (3.2mm): Suited for an array of applications.

    Smaller Blades (2.5mm): Exhibiting heightened efficiency for smaller tasks, they conserve power and economize wood by minimizing material excision.

    Tooth Rake Angle:

    The tooth rake angle plays a substantial role in achieving unblemished and efficient cuts, especially when manoeuvring through various materials. Insights into this aspect encompass:

    Negative Rake Angle: Employed for cutting non-ferrous metals like aluminium. Proper lubrication with bobbing grease is imperative to thwart binding. A negative rake paired with diamond-shaped teeth proves effective for cleanly cutting melamine boards sans chipping.

    Positive Rake Angle: Essential for table saws, delivering a seamless feed rate.

    Low/Negative Rake Angle: Tailored for radial arm saws and mitre saws, serving as a preventive measure against any unwanted ascent during cross cuts.

    Blade Height and Acuity:

    Preserving the optimal height of the blade above the wood surface holds paramount importance. During rip cuts, it is imperative to ensure the blade's gullet hovers just above the wood's surface to minimize resistance and ensure safety. Additionally, the utilization of sharp blades is crucial. Dull blades not only compromise the quality of the cuts but also pose safety hazards due to augmented force requisites.

    In Closing:

    The process of choosing the most suitable blade for your cutting tasks goes beyond merely selecting the most convenient option. A wise choice of blades requires careful consideration of factors such as blade size, tooth count, kerf width, and tooth rake angle. Understanding how these factors affect your cuts enables you to complete woodworking tasks that are safer, more accurate, and incredibly efficient. Remember that safety is the most significant consideration. Using the right safety measures, such as a blade guard, is essential to preventing accidents and guaranteeing a safe and continuous woodworking adventure. So, embrace the art of blade choosing and watch your efforts reach previously unimaginable levels of success!


    Guarding Your Hearing: The Essential Role of Ear Defenders in Woodworking
    0 Guarding Your Hearing: The Essential Role of Ear Defenders in Woodworking

    Crafting with wood is undeniably rewarding, yet it brings along its unique set of challenges. Among these challenges often overlooked is the considerable noise emanating from woodwork machines. For those committed to responsible woodworking, addressing this issue proactively is paramount to ensure your safety and well-being.

    The Perils of Noise Exposure

    Envision spending hours within a workshop engulfed in the unrelenting clamour of woodwork machines. Extended exposure to such a cacophonous environment can yield grave repercussions for your auditory senses. The repercussions of this noise are far-reaching and irreversible, defying the prospect of recovery over time. Compounded with the natural effects of ageing, the situation becomes even more disconcerting. The care you provide for your invaluable sense of hearing deserves meticulous attention.

    A Simple Yet Impactful Resolution

    Introducing ear defenders – the often-unsung heroes of woodworking safety. These protective devices are meticulously designed to offer comfort during extended usage periods. Wearing them doesn't require much effort; rather, it just requires a small one that has significant benefits. However, there's a crucial aspect to consider not all ear defenders are crafted equal. When embarking on the quest for a suitable pair, it's imperative to seek out defenders that adhere to recognized safety standards. Keep an eye out for certifications granted by respected safety authorities like those in Britain, Europe, or the United States. Although they can cost somewhat more, the benefit they provide in protecting your hearing is truly priceless.

    Elevated Hearing Protection

    Should you aspire to elevate your hearing protection strategies, innovative alternatives await your exploration. Have you ever entertained the notion of merging hearing protection with entertainment? Now that some ear protection devices have Bluetooth capabilities, you can enjoy your favourite tunes while still protecting your auditory senses.

    Moreover, for those engaged in activities like pistol shooting, specialized defenders are available that effectively filter out the deafening gunshots while enabling you to engage in conversations around you. These defenders integrate a microphone and speaker arrangement, adeptly striking a balance between safety and social interaction. This ingenious solution aptly illustrates the influence of innovation within the realm of hearing protection.

    Prioritizing Noise and Safety with Table Saws and Routers

    In summation, while woodworking might epitomize an artistic pursuit, it shouldn't be at the expense of your auditory well-being. Equipping yourself with the appropriate pair of ear defenders allows you to shield your ears and savour your craftsmanship for years to come. Always bear in mind that your sense of hearing is irreplaceable – its preservation should be accorded utmost priority. Therefore, gear up, prioritize safety, and let the symphony of your creations resonate as the sole melody in your workshop.