Close
All Categories
    Filters
    Preferences
    Search
    RSS

    Strand Hardware Blog

    Mastering Bandsaw Precision: A Comprehensive Guide to Blade Selection and Alignment
    0 Mastering Bandsaw Precision: A Comprehensive Guide to Blade Selection and Alignment

    Bandsaws, versatile tools renowned for their precision in woodworking tasks, occasionally encounter obstacles that impede their performance. Within this article, we will delve into prevalent issues faced by bandsaw users—blades breaking, inaccurate cuts, and unwelcome noises. We will delve into the correlation between these issues and blade selection and improper alignment, offering practical advice to overcome these challenges and relish seamless cutting outcomes.

    Selecting the Right Blade: Ensuring Precision

    The selection of an appropriate blade is pivotal to achieving accuracy and avert potential complications.

    Here's what warrants consideration:

    Determining Blade Length: Accurate blade length is paramount. In cases where it's absent from the machine's nameplate, measurement of a fitting old blade suffices. Employ a felt-tipped pen to mark the starting point for measurement.

    Choosing Blade Width: Blade width influences cut curvature.

    • Utilize a 6mm blade for intricate curves.
    • Opt for a 10mm blade for straight and moderately curved cuts.
    • Select a 13mm blade for primarily straight cutting.

    Tooth Arrangement: Coordinating tooth configuration with wood thickness is vital. The goal is around 3 teeth engaging the wood.

    While acquiring coarser blades beyond 4 teeth per inch (tpi) is demanding, adhere to this rule of thumb:

    • 14 tpi for 6mm thick wood.
    • 6 tpi for 12mm thick wood.
    • 4 tpi for wood 20mm or thicker.

    Noise and Blade Coarseness: Annoying sounds often result from deploying a fine blade on thick wood. Counter this by switching to a coarser blade. This spacing between teeth prevents swarf entrapment and the resultant squealing noise.

    Blade Alignment: Crafting Precise Cuts

    Faulty blade alignment undermines precision and introduces frustration. This stepwise guide facilitates blade alignment for optimal outcomes:

    Step 1: Preliminary Alignment Measures

    • Loosen the blade tensioning knob.
    • Remove the table insert and the end-slot pin.
    • Extract the old blade.


    Step 2: Calibration of Blade Guides and Support Bearings

    • Loosen screws and knobs holding blade guides and support bearings. An allen key may be necessary.

    Step 3: Installing the Fresh Blade

    • Confirm that teeth face downward towards the table. Inverting the blade corrects orientation.

    Step 4: Tensioning and Tracking

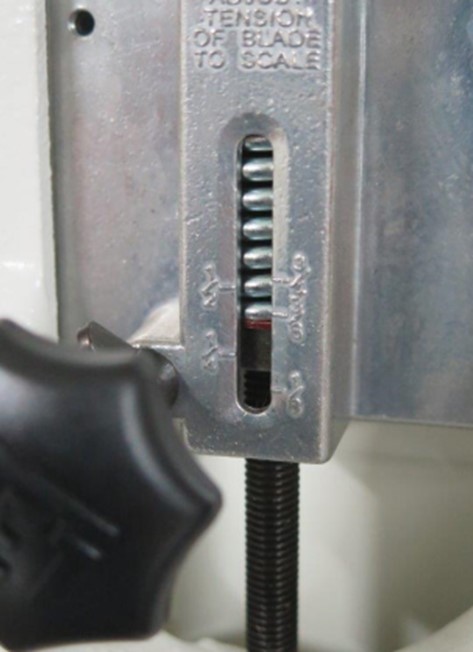
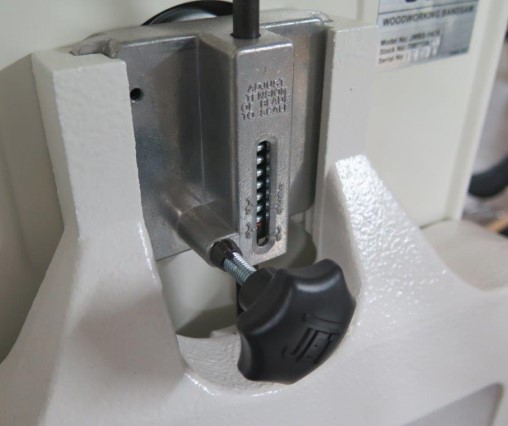
    • Apply appropriate blade tension (or 6mm deflection over 150mm distance for untitled blades).
    • Verify that the blade follows the centre of the wheel. If necessary, alter the tilt of the upper wheel.
    Step 5: Fine-tuning of Guides and Bearings

    • Start by addressing the bearings positioned behind the blade, both above and below the table.
    • Gradually shift them forward until a 1mm gap emerges between the blade and the bearing.
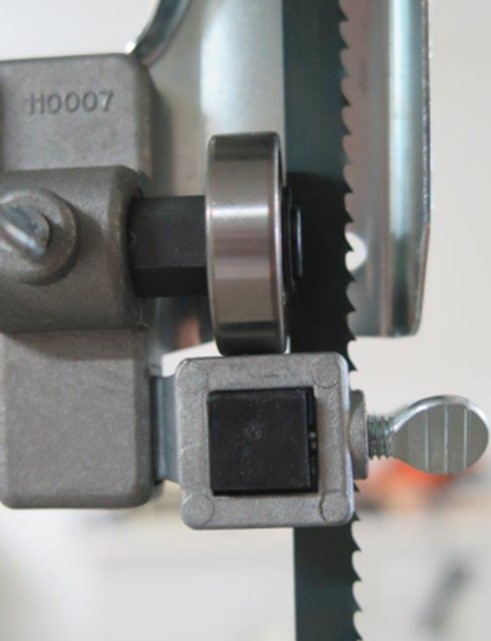
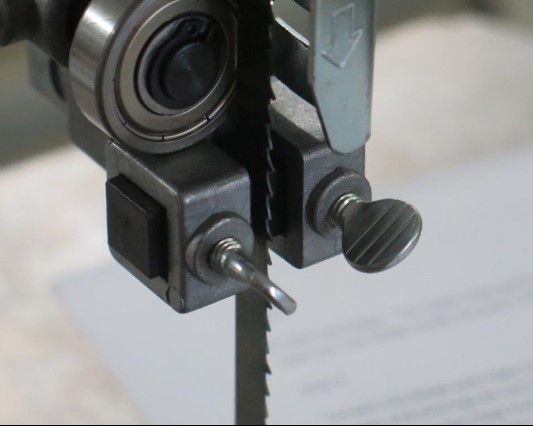
    • Proceed to adjust the guides situated on either side of the blade.
    • Maintain a minimal distance, roughly equivalent to the thickness of a sheet of paper, between these guides and the blade.
    • A helpful hint: Slide a folded piece of paper or a banknote between the blade and the guide blocks.
    • Apply pressure to secure the two blocks against the blade, locking them securely in place.

    • Afterwards, remove the paper insert and manually rotate the upper wheel to ensure smooth blade movement.
    • Note that these guides offer flexibility in both backward and forward adjustments.
    • Be cautious to prevent contact between the guides and the blade's teeth to prevent any potential blade damage.
    • If you observe wear and tear in the guide blocks, it's advisable to remove them and restore their shape by sanding them squarely with the use of a disc sander.
    Step 6: Validation of Table Alignment

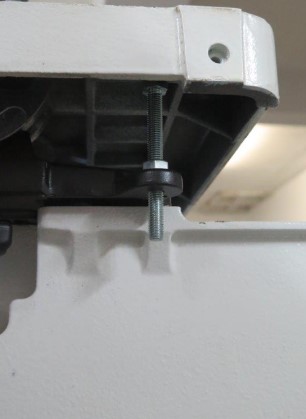
    • Confirm the table's 90-degree alignment with the blade. Make necessary adjustments through table bolts.
    Conclusion

    Adherence to these blade selection and alignment insights empowers you to surmount typical bandsaw challenges, facilitating seamless, accurate, and trouble-free cutting endeavours. Optimal blade choice and precise alignment transform your bandsaw into an instrument of pleasure, instilling the confidence and precision essential for tackling woodworking projects.

    Mastering Woodworking Success: The Art of Blade Selection for Precision Cuts
    0 Mastering Woodworking Success: The Art of Blade Selection for Precision Cuts

    In the realm of woodworking and the pursuit of successful project outcomes, there exists a pivotal but often neglected factor that holds the potential to either elevate or hinder your results: the choice of the appropriate blade. The importance of choosing the right blade goes beyond mere insignificance; it serves as a crucial factor that directly determines the quality of your cuts and, eventually, influences the success of your project.

    Determining Blade Size and Bore Size:

    Before delving into the intricacies of blade selection, it is essential to commence with the fundamentals: ascertaining the suitable blade size and bore size for your machinery. These measurements hold a paramount role in ensuring not only optimal performance but also the safety of the operation. The alignment of blade diameter and bore size with your equipment's specifications is imperative to ensure a seamless operation that yields precision cuts.

    Factors to Contemplate During Blade Selection:

    Beyond the rudimentary attributes of blade and bore dimensions, there lies an array of other elements that beckon your consideration for a well-informed blade choice. Let's begin a thorough investigation of these crucial aspects:

    Number of Teeth:

    The quantity of teeth adorning a blade exerts a substantial influence on the nature of the cuts attainable. Distinct cutting tasks warrant recommended tooth counts:

    24 Teeth: An optimal choice for rip cuts, where the objective is to sever along the wood's grain.

    60 Teeth: Tailored for cross cuts, enabling meticulous incisions across the grain's span.

    40 Teeth: A versatile selection catering to combination tasks, affording equilibrium between ripping and cross-cutting endeavours.

    Kerf Width:

    The width of the cut induced by the blade, denoted as kerf width, holds the key to curbing material wastage and energy consumption. Broadly speaking:

    Standard Width (3.2mm): Suited for an array of applications.

    Smaller Blades (2.5mm): Exhibiting heightened efficiency for smaller tasks, they conserve power and economize wood by minimizing material excision.

    Tooth Rake Angle:

    The tooth rake angle plays a substantial role in achieving unblemished and efficient cuts, especially when manoeuvring through various materials. Insights into this aspect encompass:

    Negative Rake Angle: Employed for cutting non-ferrous metals like aluminium. Proper lubrication with bobbing grease is imperative to thwart binding. A negative rake paired with diamond-shaped teeth proves effective for cleanly cutting melamine boards sans chipping.

    Positive Rake Angle: Essential for table saws, delivering a seamless feed rate.

    Low/Negative Rake Angle: Tailored for radial arm saws and mitre saws, serving as a preventive measure against any unwanted ascent during cross cuts.

    Blade Height and Acuity:

    Preserving the optimal height of the blade above the wood surface holds paramount importance. During rip cuts, it is imperative to ensure the blade's gullet hovers just above the wood's surface to minimize resistance and ensure safety. Additionally, the utilization of sharp blades is crucial. Dull blades not only compromise the quality of the cuts but also pose safety hazards due to augmented force requisites.

    In Closing:

    The process of choosing the most suitable blade for your cutting tasks goes beyond merely selecting the most convenient option. A wise choice of blades requires careful consideration of factors such as blade size, tooth count, kerf width, and tooth rake angle. Understanding how these factors affect your cuts enables you to complete woodworking tasks that are safer, more accurate, and incredibly efficient. Remember that safety is the most significant consideration. Using the right safety measures, such as a blade guard, is essential to preventing accidents and guaranteeing a safe and continuous woodworking adventure. So, embrace the art of blade choosing and watch your efforts reach previously unimaginable levels of success!


    Enhance Woodworking Efficiency: Mastering the Art of Blade Replacement and Height Adjustment
    0 Enhance Woodworking Efficiency: Mastering the Art of Blade Replacement and Height Adjustment

    You may have been postponing the task of replacing the dull blades on your jointer/thicknesser, but believe us, it's a worthwhile job. Operating with blunt blades is unproductive. Allocating just half an hour to complete this task can significantly boost your machine's performance and the quality of your woodworking projects. In this guide, we'll take you through the process of changing and adjusting the blades on your jointer/thicknesser to ensure optimal operation.

    Step 1: Removing and Cleaning Blades

    The initial step in this process involves taking out the dull blades from the cutter block. Once removed, take some time to thoroughly clean the slots in the cutter block. Dust, chips, and resin can accumulate in these slots over time, negatively impacting the blade's performance.

    Step 2: Setting the Blade Height

    Achieving the correct blade height is essential for achieving smooth and precise cuts. Aim to set the maximum blade height to about 0.2mm above the outfeed table surface, approximately the thickness of a newspaper. A common method for getting this height right is by using a straight edge with two marks spaced roughly 3mm apart. Set the height so that as you rotate the cutter block, the straight edge moves seamlessly from one mark to the next. This process should be repeated for all three blades to ensure consistent results.

    Step 3: Testing and Refining the Height

    After establishing the blade height, it's time to test your adjustments. Start by surfacing a piece of wood and look for any signs of "snipe," which is a slightly deeper cut that occurs at the end of the wood piece. If you observe snipe, adjust the blade height until it disappears. It's crucial to find the right balance – setting the blades too low might result in a tapered cut. Take your time to achieve the perfect blade height setting.


    Step 4: Using Blade Setting Gauges

    To make the height adjustment process even more efficient, you can utilize a blade setting gauge. This gauge comes with magnetized feet and a probe. Before removing the old blades, measure the blade height using the gauge. When inserting the new blades, you can use the same measurement for swift and accurate blade positioning. The magnetic properties of the gauge will hold the blades in place, simplifying the setting process. This versatile tool can also be employed for thicknesser blades.


    Conclusion:

    While it might seem tempting to postpone the replacement and adjustment of your jointer/thicknesser blades, the undeniable performance improvements make it a worthwhile endeavour. By dedicating just 30 minutes to this process, you're ensuring that your woodworking machine operates at its peak efficiency, delivering high-quality results in your projects. Don't hesitate – follow these steps to replace and set your blades correctly and experience the transformative impact it can have on your woodworking projects.