Close
All Categories
    Filters
    Preferences
    Search
    RSS

    Blog posts of '2023' 'August'

    Mastering Woodworking Success: The Art of Blade Selection for Precision Cuts
    0 Mastering Woodworking Success: The Art of Blade Selection for Precision Cuts

    In the realm of woodworking and the pursuit of successful project outcomes, there exists a pivotal but often neglected factor that holds the potential to either elevate or hinder your results: the choice of the appropriate blade. The importance of choosing the right blade goes beyond mere insignificance; it serves as a crucial factor that directly determines the quality of your cuts and, eventually, influences the success of your project.

    Determining Blade Size and Bore Size:

    Before delving into the intricacies of blade selection, it is essential to commence with the fundamentals: ascertaining the suitable blade size and bore size for your machinery. These measurements hold a paramount role in ensuring not only optimal performance but also the safety of the operation. The alignment of blade diameter and bore size with your equipment's specifications is imperative to ensure a seamless operation that yields precision cuts.

    Factors to Contemplate During Blade Selection:

    Beyond the rudimentary attributes of blade and bore dimensions, there lies an array of other elements that beckon your consideration for a well-informed blade choice. Let's begin a thorough investigation of these crucial aspects:

    Number of Teeth:

    The quantity of teeth adorning a blade exerts a substantial influence on the nature of the cuts attainable. Distinct cutting tasks warrant recommended tooth counts:

    24 Teeth: An optimal choice for rip cuts, where the objective is to sever along the wood's grain.

    60 Teeth: Tailored for cross cuts, enabling meticulous incisions across the grain's span.

    40 Teeth: A versatile selection catering to combination tasks, affording equilibrium between ripping and cross-cutting endeavours.

    Kerf Width:

    The width of the cut induced by the blade, denoted as kerf width, holds the key to curbing material wastage and energy consumption. Broadly speaking:

    Standard Width (3.2mm): Suited for an array of applications.

    Smaller Blades (2.5mm): Exhibiting heightened efficiency for smaller tasks, they conserve power and economize wood by minimizing material excision.
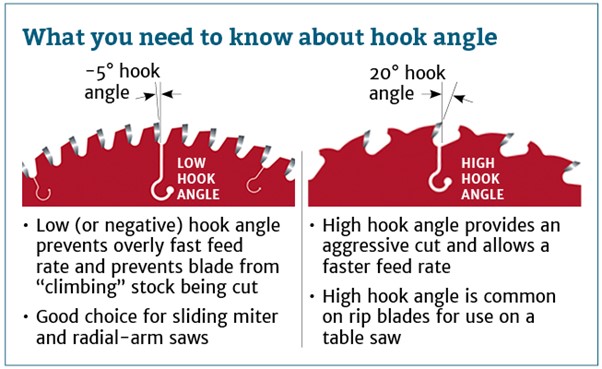
    Tooth Rake Angle:

    The tooth rake angle plays a substantial role in achieving unblemished and efficient cuts, especially when manoeuvring through various materials. Insights into this aspect encompass:

    Negative Rake Angle: Employed for cutting non-ferrous metals like aluminium. Proper lubrication with bobbing grease is imperative to thwart binding. A negative rake paired with diamond-shaped teeth proves effective for cleanly cutting melamine boards sans chipping.

    Positive Rake Angle: Essential for table saws, delivering a seamless feed rate.

    Low/Negative Rake Angle: Tailored for radial arm saws and mitre saws, serving as a preventive measure against any unwanted ascent during cross cuts.

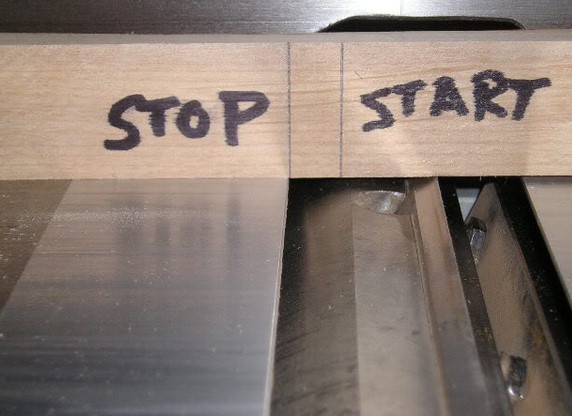
    Blade Height and Acuity:

    Preserving the optimal height of the blade above the wood surface holds paramount importance. During rip cuts, it is imperative to ensure the blade's gullet hovers just above the wood's surface to minimize resistance and ensure safety. Additionally, the utilization of sharp blades is crucial. Dull blades not only compromise the quality of the cuts but also pose safety hazards due to augmented force requisites.

    In Closing:

    The process of choosing the most suitable blade for your cutting tasks goes beyond merely selecting the most convenient option. A wise choice of blades requires careful consideration of factors such as blade size, tooth count, kerf width, and tooth rake angle. Understanding how these factors affect your cuts enables you to complete woodworking tasks that are safer, more accurate, and incredibly efficient. Remember that safety is the most significant consideration. Using the right safety measures, such as a blade guard, is essential to preventing accidents and guaranteeing a safe and continuous woodworking adventure. So, embrace the art of blade choosing and watch your efforts reach previously unimaginable levels of success!


    Guarding Your Hearing: The Essential Role of Ear Defenders in Woodworking
    0 Guarding Your Hearing: The Essential Role of Ear Defenders in Woodworking

    Crafting with wood is undeniably rewarding, yet it brings along its unique set of challenges. Among these challenges often overlooked is the considerable noise emanating from woodwork machines. For those committed to responsible woodworking, addressing this issue proactively is paramount to ensure your safety and well-being.

    The Perils of Noise Exposure

    Envision spending hours within a workshop engulfed in the unrelenting clamour of woodwork machines. Extended exposure to such a cacophonous environment can yield grave repercussions for your auditory senses. The repercussions of this noise are far-reaching and irreversible, defying the prospect of recovery over time. Compounded with the natural effects of ageing, the situation becomes even more disconcerting. The care you provide for your invaluable sense of hearing deserves meticulous attention.

    A Simple Yet Impactful Resolution

    Introducing ear defenders – the often-unsung heroes of woodworking safety. These protective devices are meticulously designed to offer comfort during extended usage periods. Wearing them doesn't require much effort; rather, it just requires a small one that has significant benefits. However, there's a crucial aspect to consider not all ear defenders are crafted equal. When embarking on the quest for a suitable pair, it's imperative to seek out defenders that adhere to recognized safety standards. Keep an eye out for certifications granted by respected safety authorities like those in Britain, Europe, or the United States. Although they can cost somewhat more, the benefit they provide in protecting your hearing is truly priceless.

    Elevated Hearing Protection

    Should you aspire to elevate your hearing protection strategies, innovative alternatives await your exploration. Have you ever entertained the notion of merging hearing protection with entertainment? Now that some ear protection devices have Bluetooth capabilities, you can enjoy your favourite tunes while still protecting your auditory senses.

    Moreover, for those engaged in activities like pistol shooting, specialized defenders are available that effectively filter out the deafening gunshots while enabling you to engage in conversations around you. These defenders integrate a microphone and speaker arrangement, adeptly striking a balance between safety and social interaction. This ingenious solution aptly illustrates the influence of innovation within the realm of hearing protection.

    Prioritizing Noise and Safety with Table Saws and Routers

    In summation, while woodworking might epitomize an artistic pursuit, it shouldn't be at the expense of your auditory well-being. Equipping yourself with the appropriate pair of ear defenders allows you to shield your ears and savour your craftsmanship for years to come. Always bear in mind that your sense of hearing is irreplaceable – its preservation should be accorded utmost priority. Therefore, gear up, prioritize safety, and let the symphony of your creations resonate as the sole melody in your workshop.


    Elevate Your Woodworking Precision: Creating a Jig for 45-Degree Mitres
    0 Elevate Your Woodworking Precision: Creating a Jig for 45-Degree Mitres

    When delving into framing or segmented woodworking endeavours, achieving precise 45-degree mitres becomes an essential pursuit. While this may appear to be a daunting task, fret not! We present a remedy – a self-fashioned jig that serves as your ticket to attaining the exactness you require. In this piece, we will escort you through the entire fabrication process of this jig, shedding light on the steps involved and the safety precautions to bear in mind.

    Constructing the Jig: Step by Step

    Step 1: Preparing the Hardwood Strips

    To initiate the fabrication of your accurate 45-degree mitre jig, you'll necessitate a duo of hardwood pieces. These segments should slot neatly into the milled grooves of your saw table, with a slight variance in width – causing the left component to be marginally narrower. Affix the left strip firmly using screws and adhesive, ensuring its secure placement. The right strip necessitates elongated screw apertures to permit lateral adjustments. Remember, the strips should glide against the outer edges of the grooves for optimal efficacy. To facilitate seamless motion, administer a coating of wax to the runners. Even if your saw table boasts a solitary groove, rest assured – this methodology still applies.

    Step 2: Opting for Appropriate Platform Material

    For the foundational base of your jig, Supawood proves to be an impeccable selection owing to its steadfastness and resistance to warping. Cut a Supawood piece to dimensions approximating 500x400, laying the groundwork for your jig's structure.

    Step 3: Integrating the Hardwood Strips

    Insert the pair of pre-prepared hardwood strips into the crevices of the saw table. Following this, firmly affix the Supawood piece onto these strips using screws. This juncture constitutes the core structure of your jig, forming the bedrock for achieving meticulous 45-degree mitres.

    Step 4: Infusing the Desired Angle

    Secure two segments measuring around 25x60mm each to craft a right-angle configuration. The alignment of these sections to a 45-degree angle concerning the saw blade is of paramount importance. This configuration underpins the precision of your mitre cuts.

    Step 5: Ensuring Flawless Alignment

    Before tightening the screws that secure the angle components, introduce a square within the formed right angle. This step stands as a critical validation of the angle segments' precise 90-degree alignment. The accuracy of your jig hinges on this alignment. Exercise patience during this stage to avert any inconsistencies in your mitre cuts in subsequent phases.

    Prioritizing Safety: Safeguarding the Blade

    To ensure your safety while employing the jig, contemplate installing a protective enclosure over the blade. While a Perspex cover emerges as an effective choice, it's worth noting that occasional cleaning might be requisite. Safety should remain sacrosanct, especially when dealing with meticulous cuts required for framing and segmented projects. Incorporating these safety protocols will furnish you with a sense of assurance as you engage with your freshly fabricated jig.

    Conclusion:

    The days of grappling with accurate 45-degree mitres are behind you, all thanks to this in-house jig that imparts the necessary precision to your framing and segmented woodworking ventures. By adhering to the comprehensive construction roadmap and upholding vigilance toward safety, you can actualize a dependable tool that guarantees the precision of your cuts and the excellence of your undertakings. Embark on this journey and acquaint yourself with this jig – it's time to elevate your woodworking craftsmanship!

    Mastering Precision in Woodworking: Unveiling Essential Measuring Tools for Your Workshop
    0 Mastering Precision in Woodworking: Unveiling Essential Measuring Tools for Your Workshop

    Precision reigns supreme in the realm of woodworking and craftsmanship. Whether you're a seasoned professional or a dedicated hobbyist, the foundation of successful projects lies in accurate measurements. While tape measures, rulers, and try squares hold their well-deserved positions in every workshop, a trove of lesser-known measuring tools exists, ready to enhance your precision game. In this article, we'll explore these tools that have the potential to become your trusted allies.

    Marking Knife: The Epitome of Precision

    When uncompromising accuracy is essential, the marking knife takes the spotlight. This instrument's slender, precise line creates a marking outline that fits seamlessly against the rule, eliminating any margin for errors. In contrast to pencils, it maintains its edge over time, ensuring consistent accuracy.

    Combination Square: Versatility Redefined

    The combination square transcends its square shape, evolving into a versatile multitool that's indispensable in any workshop. Let's delve into its capabilities:

    • By sliding the rule within its housing, easy parallel line marking becomes achievable.
    • Measuring the depth of mortises becomes effortless by inserting the rule into the joint and referencing the base.
    • Accurate 45-degree mitres are a simple task.
    • The incorporated spirit level simplifies shelf levelling.
    • The built-in scribing point aids in drawing exact lines.
    • Enhance its functions with accessories like the centre-finding head and protractor for diverse angles.

    Try Square: Your Trusted Accuracy Companion

    Quality is pivotal when it comes to Try squares. Seek out a square with a Rosewood base and brass inlay to counteract wear. Validate its precision by marking parallel lines with a recognized straight edge, ensuring consistent measurements from both sides of the square.

    Vernier Callipers: Elevating Precision

    While not intended for marking, vernier callipers are indispensable for meticulous measurements. Capable of measuring down to 0.1mm, they're a necessity for critical accuracy. The scale is read from the 0-marked line on the right-side jaw. To determine the next decimal point, align the lines on the lower scale with those on the scale above. Digital variations offer even greater user-friendliness, provided the battery is operational.

    Spring Dividers or Compasses: Perfect for Intervals and Circles

    Whether you're marking regular intervals or circles, spring dividers come to your aid. These tools aren't solely beneficial for woodturners; they also serve as invaluable companions for a range of projects.

    Trammel Points: Crafting Grand Circles

    When the task involves sketching large circles, trammel points come into play. Utilizing a ruler or wooden strip as a spacer, they're ideal for projects involving bandsaws or jigsaws to cut circles.

    INCRA Rules: Precision with Flair

    INCRA rules elevate accuracy with grooves spaced at 1mm intervals. Slide a 0.5mm lead pencil through these grooves for unparalleled precision in your measurements.

    Conclusion:

    In the world of woodworking, the choice of measuring tools can be the decisive factor between a flawless masterpiece and a disappointing mishap. Beyond the familiar tape measures and squares, a myriad of specialized instruments beckons exploration. From marking knives to vernier callipers, each tool contributes its unique prowess, enhancing the precision and excellence of your work. So, the next time you enter your workshop, contemplate diversifying your measuring arsenal – your projects will undoubtedly appreciate it.


    Enhance Woodworking Efficiency: Mastering the Art of Blade Replacement and Height Adjustment
    0 Enhance Woodworking Efficiency: Mastering the Art of Blade Replacement and Height Adjustment

    You may have been postponing the task of replacing the dull blades on your jointer/thicknesser, but believe us, it's a worthwhile job. Operating with blunt blades is unproductive. Allocating just half an hour to complete this task can significantly boost your machine's performance and the quality of your woodworking projects. In this guide, we'll take you through the process of changing and adjusting the blades on your jointer/thicknesser to ensure optimal operation.

    Step 1: Removing and Cleaning Blades

    The initial step in this process involves taking out the dull blades from the cutter block. Once removed, take some time to thoroughly clean the slots in the cutter block. Dust, chips, and resin can accumulate in these slots over time, negatively impacting the blade's performance.

    Step 2: Setting the Blade Height

    Achieving the correct blade height is essential for achieving smooth and precise cuts. Aim to set the maximum blade height to about 0.2mm above the outfeed table surface, approximately the thickness of a newspaper. A common method for getting this height right is by using a straight edge with two marks spaced roughly 3mm apart. Set the height so that as you rotate the cutter block, the straight edge moves seamlessly from one mark to the next. This process should be repeated for all three blades to ensure consistent results.

    Step 3: Testing and Refining the Height

    After establishing the blade height, it's time to test your adjustments. Start by surfacing a piece of wood and look for any signs of "snipe," which is a slightly deeper cut that occurs at the end of the wood piece. If you observe snipe, adjust the blade height until it disappears. It's crucial to find the right balance – setting the blades too low might result in a tapered cut. Take your time to achieve the perfect blade height setting.


    Step 4: Using Blade Setting Gauges

    To make the height adjustment process even more efficient, you can utilize a blade setting gauge. This gauge comes with magnetized feet and a probe. Before removing the old blades, measure the blade height using the gauge. When inserting the new blades, you can use the same measurement for swift and accurate blade positioning. The magnetic properties of the gauge will hold the blades in place, simplifying the setting process. This versatile tool can also be employed for thicknesser blades.


    Conclusion:

    While it might seem tempting to postpone the replacement and adjustment of your jointer/thicknesser blades, the undeniable performance improvements make it a worthwhile endeavour. By dedicating just 30 minutes to this process, you're ensuring that your woodworking machine operates at its peak efficiency, delivering high-quality results in your projects. Don't hesitate – follow these steps to replace and set your blades correctly and experience the transformative impact it can have on your woodworking projects.