When delving into framing or segmented woodworking endeavours, achieving precise 45-degree mitres becomes an essential pursuit. While this may appear to be a daunting task, fret not! We present a remedy – a self-fashioned jig that serves as your ticket to attaining the exactness you require. In this piece, we will escort you through the entire fabrication process of this jig, shedding light on the steps involved and the safety precautions to bear in mind.
Constructing the Jig: Step by Step


Step 1: Preparing the Hardwood Strips
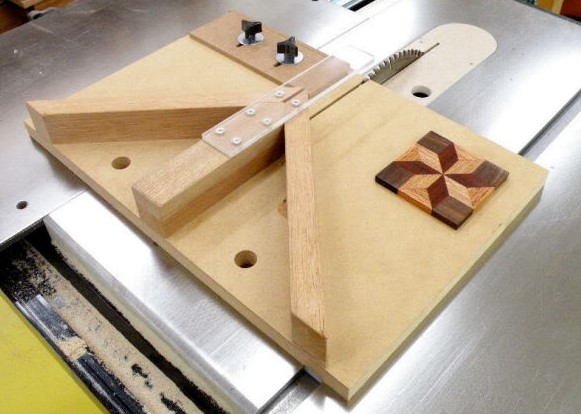
To initiate the fabrication of your accurate 45-degree mitre jig, you'll necessitate a duo of hardwood pieces. These segments should slot neatly into the milled grooves of your saw table, with a slight variance in width – causing the left component to be marginally narrower. Affix the left strip firmly using screws and adhesive, ensuring its secure placement. The right strip necessitates elongated screw apertures to permit lateral adjustments. Remember, the strips should glide against the outer edges of the grooves for optimal efficacy. To facilitate seamless motion, administer a coating of wax to the runners. Even if your saw table boasts a solitary groove, rest assured – this methodology still applies.
Step 2: Opting for Appropriate Platform Material
For the foundational base of your jig, Supawood proves to be an impeccable selection owing to its steadfastness and resistance to warping. Cut a Supawood piece to dimensions approximating 500x400, laying the groundwork for your jig's structure.
Step 3: Integrating the Hardwood Strips
Insert the pair of pre-prepared hardwood strips into the crevices of the saw table. Following this, firmly affix the Supawood piece onto these strips using screws. This juncture constitutes the core structure of your jig, forming the bedrock for achieving meticulous 45-degree mitres.
Step 4: Infusing the Desired Angle
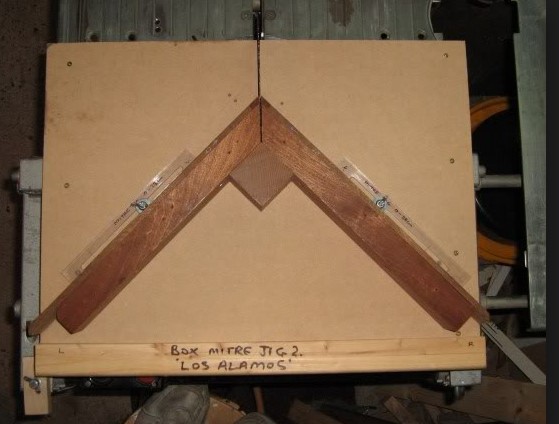
Secure two segments measuring around 25x60mm each to craft a right-angle configuration. The alignment of these sections to a 45-degree angle concerning the saw blade is of paramount importance. This configuration underpins the precision of your mitre cuts.
Step 5: Ensuring Flawless Alignment
Before tightening the screws that secure the angle components, introduce a square within the formed right angle. This step stands as a critical validation of the angle segments' precise 90-degree alignment. The accuracy of your jig hinges on this alignment. Exercise patience during this stage to avert any inconsistencies in your mitre cuts in subsequent phases.
Prioritizing Safety: Safeguarding the Blade
To ensure your safety while employing the jig, contemplate installing a protective enclosure over the blade. While a Perspex cover emerges as an effective choice, it's worth noting that occasional cleaning might be requisite. Safety should remain sacrosanct, especially when dealing with meticulous cuts required for framing and segmented projects. Incorporating these safety protocols will furnish you with a sense of assurance as you engage with your freshly fabricated jig.

Conclusion:
The days of grappling with accurate 45-degree mitres are behind you, all thanks to this in-house jig that imparts the necessary precision to your framing and segmented woodworking ventures. By adhering to the comprehensive construction roadmap and upholding vigilance toward safety, you can actualize a dependable tool that guarantees the precision of your cuts and the excellence of your undertakings. Embark on this journey and acquaint yourself with this jig – it's time to elevate your woodworking craftsmanship!


