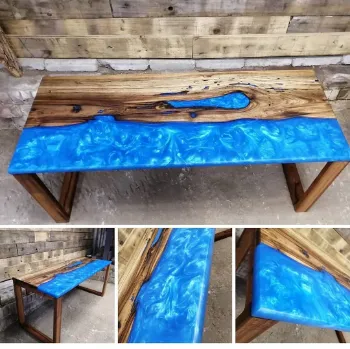
Incorporating resin in woodworking

Incorporating resin in woodworking
Enthusiasts of woodworking are continually on the lookout for innovative ways to enhance their craftsmanship. An increasingly popular technique is the integration of resin into woodworking projects, imparting a distinctive aesthetic, durability, and versatility to wooden creations. This guide aims to delve into the remarkable potential of incorporating resin in woodworking, offering valuable insights and tips to assist in creating remarkable resin-infused woodwork.
Understanding Resin and Its Characteristics
Resin stands as a versatile material, either synthetic or natural, which can be poured, moulded, or shaped to produce diverse finishes and effects. Primarily, epoxy resin finds prevalent use in woodworking owing to its robustness, transparency, and strong adhesion to wood.
Selecting the Appropriate Resin
The careful selection of the right resin is pivotal for the success of woodworking projects. Opt for epoxy resin tailored specifically for woodworking, as it ensures optimal bonding and longevity. Consider factors like curing time, clarity, and UV resistance while making your resin choice.
Prepping the Wooden Surface
Ensuring proper preparation of the wooden surface is vital to achieve a flawless resin finish. Smoothly sand the wood, creating an even surface and eliminating any dust or debris. The application of a sealant or primer is essential to prevent the formation of air bubbles during the resin pour.
Crafting Designs and Patterns
Resin opens doors to infuse creativity into woodworking ventures. Experiment with an array of designs, hues, and patterns by blending pigments or incorporating metallic powders into the resin. Create mesmerizing effects such as swirls, waves, or a marbled appearance.
Pouring and Dispersing the Resin
Exercise caution while measuring and blending the resin following the manufacturer's instructions. Gently pour the resin onto the prepared wooden surface, ensuring even coverage. Utilize a spreader or brush to encompass the entire area, paying close attention to reaching all edges and corners.
Eliminating Air Bubbles
Employ a heat gun or torch to eradicate air bubbles from the resin for a polished, flawless finish. Move the heat source in a sweeping motion across the surface, allowing the bubbles to ascend and burst.
Curing and Finalizing
Adhere to the recommended curing duration provided by the manufacturer. After the resin is cured, gently sand the surface to eliminate any imperfections or rough patches. Apply a topcoat or sealer to augment the resin's lustre and safeguard the woodwork.
Crafting Brilliance: Elevate Woodworking with Resin Infusion
The infusion of resin into woodworking presents an abundance of opportunities, empowering artisans to craft distinctive, attention-grabbing pieces. Experiment with various techniques and designs to unleash your creative potential and elevate your woodworking projects to unparalleled levels.
